Next part of my migration blog series, this time how to migrate Linux RHEL 6.5 from XenServer to Nutanix AHV.
So far you could read:
- Migrate Windows 2012R2 from Citrix XenServer to Nutanix AHV
- Migrate RHEL 6.5 from ESXi to Nutanix AHV
- Migrate Suse Linux from VMware ESXi to Nutanix AHV in minutes
- Migrate Windows 2012R2 server from ESXi to AHV in 5 minutes
Requirements:
- AOS – 4.6.1.1 or newer
- AHV – 20160217.2 or newer
- XenServer 6.5 or newer with XenCenter lastest buil
- connectivity between legacy XenServer servers and Nutanix CVMs over NFS
- remove all snapshots from VM
Let’s get started 🙂
- check what Linux kernel is used if you can see xen somwhere this means you have to install default kernel
[root@rhel65xc ~]# uname -a
Linux rhel65xc.gso.lab 2.6.32-431.el6.x86_64 #1 SMP Sun Nov 10 22:19:54 EST 2013 x86_64 x86_64 x86_64 GNU/Linux
[root@rhel65xc ~]#
- Check if you have virtIO drivers present in system
[root@rhel65xc ~]# grep -i virtio /boot/config-2.6.32-431.el6.x86_64
CONFIG_NET_9P_VIRTIO=m
CONFIG_VIRTIO_BLK=m
CONFIG_SCSI_VIRTIO=m
CONFIG_VIRTIO_NET=m
CONFIG_VIRTIO_CONSOLE=m
CONFIG_HW_RANDOM_VIRTIO=m
CONFIG_VIRTIO=m
CONFIG_VIRTIO_RING=m
CONFIG_VIRTIO_PCI=m
CONFIG_VIRTIO_BALLOON=m
[root@rhel65xc ~]#
- Check if virtio modules are part of the initramfs. RHEL 6.5 has virtio drivers build it. If there is not output – no modules, meaning you have to create either new initrd or initramfs images.
[root@rhel65xc ~]# zcat /boot/initramfs-2.6.32-431.el6.x86_64.img | cpio -it | grep virtio
lib/modules/2.6.32-431.el6.x86_64/kernel/drivers/block/virtio_blk.ko
lib/modules/2.6.32-431.el6.x86_64/kernel/drivers/scsi/virtio_scsi.ko
lib/modules/2.6.32-431.el6.x86_64/kernel/drivers/virtio
lib/modules/2.6.32-431.el6.x86_64/kernel/drivers/virtio/virtio.ko
lib/modules/2.6.32-431.el6.x86_64/kernel/drivers/virtio/virtio_pci.ko
lib/modules/2.6.32-431.el6.x86_64/kernel/drivers/virtio/virtio_ring.ko
- create new initrd with virtio modules – RHEL 5.X
[root@rhel65xc ~]# mkinitrd --with="virtio_blk virtio_pci" -f -v /boot/initrd-`uname -r`.img `uname -r`
- create new initrd with virtio modules – RHEL 6.X
[root@rhel65xc ~]# dracut --add-drivers "virtio_pci virtio_blk" -f -v /boot/initramfs-`uname -r`.img `uname -r`
- check new initrd (RHEL 6.X), virtio modules are there. we can stop server
[root@rhel65xc ~]# zcat /boot/initramfs-`uname -r`.img | cpio -it | grep virtio
lib/modules/2.6.32-431.el6.x86_64/kernel/drivers/block/virtio_blk.ko
lib/modules/2.6.32-431.el6.x86_64/kernel/drivers/scsi/virtio_scsi.ko
lib/modules/2.6.32-431.el6.x86_64/kernel/drivers/virtio
lib/modules/2.6.32-431.el6.x86_64/kernel/drivers/virtio/virtio.ko
lib/modules/2.6.32-431.el6.x86_64/kernel/drivers/virtio/virtio_pci.ko
lib/modules/2.6.32-431.el6.x86_64/kernel/drivers/virtio/virtio_ring.ko
96407 blocks
- Update /boot/grub/grub.conf so that console=ttyS0 rather then console=hvc0.
- In /etc/fstab remove disk UUID which is next to /boot and replace it by /dev/hda
- Update /boot/grub/device.map and replace xvda with hda
- Make sure VM boots in HVM mode with ‘xe vm-param-set uuid=[vm uuid] HVM-boot-policy=”BIOS order”‘ (you can get the vm uuid with xe vm-list) from the XenServer
- Reboot the VM.
[root@xenserver01 ~]# xe vm-list
uuid ( RO) : 480a7144-bf18-4c2e-a623-ee404fd8e70f
 name-label ( RW): Control domain on host: xenserver01.gso.lab
 power-state ( RO): running

uuid ( RO) : 021a6ea2-f11d-8590-931e-2bbd434f0998
 name-label ( RW): rhel65xs
 power-state ( RO): halted

[root@xenserver01 ~]# xe vm-param-set uuid=021a6ea2-f11d-8590-931e-2bbd434f0998 HVM-boot-policy="BIOS order"
[root@xenserver01 ~]# xe vm-param-get uuid=021a6ea2-f11d-8590-931e-2bbd434f0998 param-name=HVM-boot-policy
BIOS order
[root@xenserver01 ~]#
- Stop VM
- List all VM disk, use command xe vm-disk-list uuid=<VM-UUID> – see example below. Note down UUID for VDI entry.
[root@xenserver01 ~]# xe vm-list
uuid ( RO) : 480a7144-bf18-4c2e-a623-ee404fd8e70f
 name-label ( RW): Control domain on host: xenserver01.gso.lab
 power-state ( RO): running

uuid ( RO) : 021a6ea2-f11d-8590-931e-2bbd434f0998
 name-label ( RW): rhel65xs
 power-state ( RO): halted

[root@xenserver01 ~]# xe vm-disk-list uuid=021a6ea2-f11d-8590-931e-2bbd434f0998
Disk 0 VBD:
uuid ( RO) : 547baeb1-b117-68df-d423-f3b4b6764bd8
 vm-name-label ( RO): rhel65xs
 userdevice ( RW): 0

Disk 0 VDI:
uuid ( RO) : 1433eadb-218c-4c22-b7bb-5931a5aec369
 name-label ( RW): rhel65xs 0
 sr-name-label ( RO): NFS virtual disk storage
 virtual-size ( RO): 8589934592
- Use qemu-img tool to convert disk from VHD to RAW – see example below
[root@kvm01]# qemu-img convert -f vpc 1433eadb-218c-4c22-b7bb-5931a5aec369.vhd -O raw rhel65xs01.img
- Transfer file onto Nutanix container
- Log in to Nutanix Acropolis and provision VM
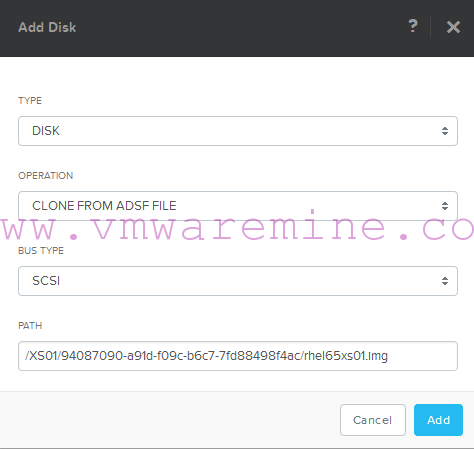
- Add new disk
- Type: DISK
- Operation: CLONE FROM ADSF FILE
- Bus type: SCSI
- Path – provide path to VM file image in raw format
- add network adapter
- Take VM snaphot
- Power VM on
Now we have to fix networking.
- Remove below file and reboot VM
[root@rhel65xs ~]# rm -f /etc/udev/rules.d/70-persistent-net.rules
- Edit the same file and:
- note down MAC address
- change eth1 to eth0
# This file was automatically generated by the /lib/udev/write_net_rules
# program, run by the persistent-net-generator.rules rules file.
#
# You can modify it, as long as you keep each rule on a single
# line, and change only the value of the NAME= key.

# PCI device 0x1af4:0x1000 (virtio-pci)
SUBSYSTEM=="net", ACTION=="add", DRIVERS=="?*", ATTR{address}=="52:54:00:2a:43:c6", ATTR{type}=="1", KERNEL=="eth*", NAME="eth0"
- Edit network configuration file and:
- remove UUID
- change MAC address
[root@rhel65xs ~]# vi /etc/sysconfig/network-scripts/ifcfg-eth0
DEVICE=eth0
TYPE=Ethernet
ONBOOT=yes
NM_CONTROLLED=yes
BOOTPROTO=none
HWADDR=52:54:00:2a:43:c6
IPADDR=10.4.92.22
PREFIX=24
GATEWAY=10.4.92.1
DNS1=10.4.89.111
DEFROUTE=yes
IPV4_FAILURE_FATAL=yes
IPV6INIT=no
NAME="System eth0"
- restart networking services and you should have network up and running
[root@rhel65xs ~]# service network restart
Shutting down interface eth0: [ OK ]
Shutting down loopback interface: [ OK ]
Bringing up loopback interface: [ OK ]
Bringing up interface eth0: Determining if ip address 10.4.92.22 is already in use for device eth0...
 [ OK ]
[root@rhel65xs ~]#
If you have time, watch video
![VMware vSphere: What’s New [V 5.1] – Free course](https://www.vmwaremine.com/wp-content/themes/curver/img/thumb-medium.png)

So I’m seeing something different looking at my centos 5.x vms as well as my ubuntu vms. Are there steps for those?
Have you done this successfully with RHEL/CentOS7? Trying to figure out fstab edits for /boot and if anything needs to be done in grub.cfg?