In Acropolis OS version 4.6.1 Nutanix introduced support for UEFI virtual machines. If you have AOS 4.6.1 you can migrate Generation 2 Hyper-V VMs to Nutanix AHV.
Today, I you can read how to migrate Ubuntu 14.04.3 generation 2 VM from Microsoft Hyper-V 2012R2 to Nutanix AHV.
Requirements:
- Acropolis OS (AOS) 4.7.2 or newer
- Acropolis HV (AHV – hypervisor) 20160601.20
- connectivity between hyper-V hosts and Nutanix CVM
- mounted container from Nutanix AHV to Hyper-V cluster. If you are wondering how to mount Nutanix AHV container on Hyper-v cluster – have a look at my blog post
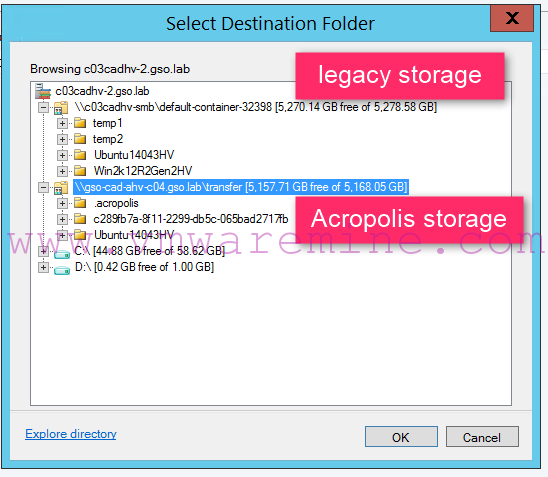
Acropolis storage mount to Hyper-V cluster
- Nutanix Acropolis knowledge and Microsoft hyper-V knowledge 🙂
- SCVMM – optional
Step #1 – Transfer virtual machine disks from legacy storage to Nutanix Acropolis
If you have SCVMM, add Acropolis container to Hyper-V cluster as new file share storage and use build in migration feature to move disks.
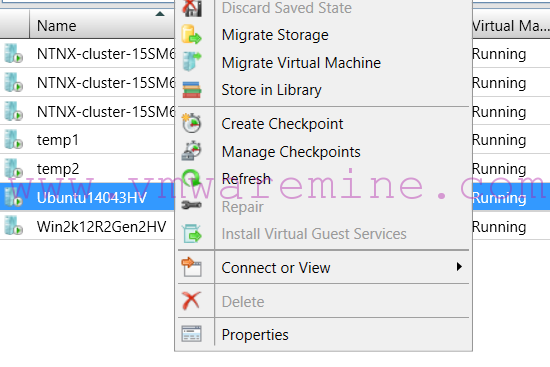
Migrate storage to Nutanix AHV
Step #2 – verify Ubuntu version
nutanix@ubuntu14043hv:~$ cat /etc/lsb-release
DISTRIB_ID=Ubuntu
DISTRIB_RELEASE=14.04
DISTRIB_CODENAME=trusty
DISTRIB_DESCRIPTION="Ubuntu 14.04.3 LTS"
nutanix@ubuntu14043hv:~$
Step #3 – verify if kernel has virIO drives
nutanix@ubuntu14043hv:~$ grep -i virtio /boot/config-`uname -r`
CONFIG_NET_9P_VIRTIO=m
CONFIG_VIRTIO_BLK=y
CONFIG_SCSI_VIRTIO=m
CONFIG_VIRTIO_NET=y
CONFIG_CAIF_VIRTIO=m
CONFIG_VIRTIO_CONSOLE=y
CONFIG_HW_RANDOM_VIRTIO=m
CONFIG_VIRTIO=y
# Virtio drivers
CONFIG_VIRTIO_PCI=y
CONFIG_VIRTIO_BALLOON=y
CONFIG_VIRTIO_MMIO=y
CONFIG_VIRTIO_MMIO_CMDLINE_DEVICES=y
nutanix@ubuntu14043hv:~$
Step #4 -confirm if the current initramfs has the virtio_scsi module built in
nutanix@ubuntu12045:~$ cp -p /boot/initrd.img-`uname -r` /tmp/initrd.img-`uname -r`.gz
nutanix@ubuntu12045:~$ zcat /tmp/initrd.img-`uname -r`.gz | cpio -it | grep virtio
lib/modules/3.13.0-32-generic/kernel/drivers/scsi/virtio_scsi.ko
lib/modules/3.13.0-32-generic/kernel/drivers/net/caif/caif_virtio.ko
103485 blocks
nutanix@ubuntu12045:~$
In the Ubuntu 12.04.5 case the virtio_scsi module is already built into the initramfs image. There is no need to rebuild the initramfs.
Step #5 – update config files
root@ubuntu14043hv:~# cp /etc/init/tty1.conf /etc/init/ttyS0.conf
root@ubuntu14043hv:~# vi
root@ubuntu14043hv:~# vi /etc/init/ttyS0.conf
update /etc/init/ttyS0.conf replace or update last line with – exec /sbin/getty -8 115200 ttyS0 xterm
# tty1 - getty
#
# This service maintains a getty on tty1 from the point the system is
# started until it is shut down again.

start on stopped rc RUNLEVEL=[2345] and (
 not-container or
 container CONTAINER=lxc or
 container CONTAINER=lxc-libvirt)

stop on runlevel [!2345]

respawn
exec /sbin/getty -8 115200 ttyS0 xterm
Update grub config file, update or replace line #11 with GRUB_CMDLINE_LINUX_DEFAULT=”console=ttyS0″
# If you change this file, run 'update-grub' afterwards to update
# /boot/grub/grub.cfg.
# For full documentation of the options in this file, see:
# info -f grub -n 'Simple configuration'

GRUB_DEFAULT=0
#GRUB_HIDDEN_TIMEOUT=0
GRUB_HIDDEN_TIMEOUT_QUIET=true
GRUB_TIMEOUT=2
GRUB_DISTRIBUTOR=`lsb_release -i -s 2> /dev/null || echo Debian`
GRUB_CMDLINE_LINUX_DEFAULT=""
GRUB_CMDLINE_LINUX=""
Update grub
root@ubuntu14043hv:~# update-grub2
Generating grub configuration file ...
Found linux image: /boot/vmlinuz-3.19.0-25-generic
Found initrd image: /boot/initrd.img-3.19.0-25-generic
done
root@ubuntu14043hv:~#
Step #6 – convert VHDX disk or disks to RAW format supported by Nutanix
Log in to CVM over SSH and run below command to convert VHDX disks to RAW.
nutanix@NTNX-15SM65300246-A-CVM:~$ qemu-img convert -f vhdx -O raw nfs://127.0.0.1/transfer/Ubuntu14043HV/Ubuntu16045HV_disk_1.vhdx nfs://127.0.0.1/transfer/Ubuntu14043HV/Ubuntu16045HV_disk_1.raw
nutanix@NTNX-15SM65300246-A-CVM:~$
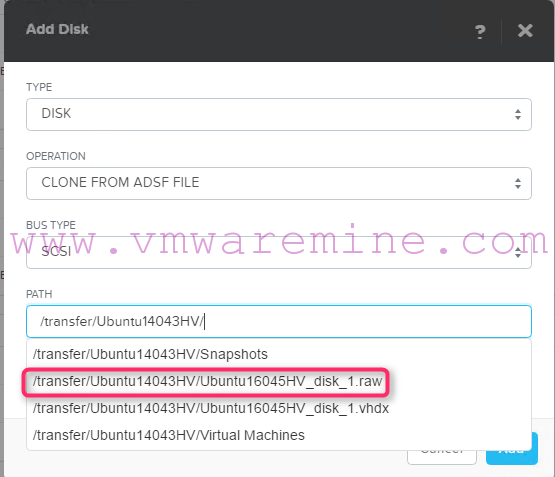
Step #7 – create new VM on Acropolis
Now, when we have disk in RAW format we can create new VM with RAW disk. Log in to Prism and create VM. Make sure you set disk properly:
- Type – DISK
- Operation – CLONE FROM ADSF FILE
- Bus Type – SCSI
- Path – provide path to raw disk
and use RAW disk as source for clone. See below screenshot as reference.
Create VM on Acropolis
- Add network adapter and connect it to the right VLAN on AHV.
Power VM on and that’s it. Migration done. Lunch VM console and check VM connectivity.
[hr]
CHANGE LOG:
- 1 Nov 2016 – updated AOS and AHV requirements