WireGuard® is an extremely simple yet fast and modern VPN that utilizes state-of-the-art cryptography. It aims to be faster, simpler, leaner, and more useful than IPsec, while avoiding the massive headache. It intends to be considerably more performant than OpenVPN. WireGuard is designed as a general purpose VPN for running on embedded interfaces and super computers alike, fit for many different circumstances. Initially released for the Linux kernel, it is now cross-platform (Windows, macOS, BSD, iOS, Android) and widely deployable. It is currently under heavy development, but already it might be regarded as the most secure, easiest to use, and simplest VPN solution in the industry.
www.wireguard.com
Install wireguard on Ubuntu
I’m using Ubuntu 20.04 for my wireguard installation but you can use any other ubuntu version. To install it, you can follow the installation guide on the wireguard website or follow my blog on how to install wireguard on Ubuntu.
add-apt-repository ppa:wireguard/wireguard$:/home/artur# sudo apt install wireguard
Reading package lists... Done
Building dependency tree
Reading state information... Done
The following package was automatically installed and is no longer required:
libfprint-2-tod1
Use 'sudo apt autoremove' to remove it.
The following additional packages will be installed:
wireguard-tools
Suggested packages:
openresolv | resolvconf
The following NEW packages will be installed:
wireguard wireguard-tools
0 upgraded, 2 newly installed, 0 to remove and 0 not upgraded.
Need to get 86.6 kB of archives.
After this operation, 344 kB of additional disk space will be used.
Do you want to continue? [Y/n] Y
Get:1 http://us.archive.ubuntu.com/ubuntu focal-updates/universe amd64 wireguard-tools amd64 1.0.20200513-1~20.04.2 [83.3 kB]
Get:2 http://us.archive.ubuntu.com/ubuntu focal-updates/universe amd64 wireguard all 1.0.20200513-1~20.04.2 [3,264 B]
Fetched 86.6 kB in 0s (639 kB/s)
Selecting previously unselected package wireguard-tools.
(Reading database ... 160813 files and directories currently installed.)
Preparing to unpack .../wireguard-tools_1.0.20200513-1~20.04.2_amd64.deb ...
Unpacking wireguard-tools (1.0.20200513-1~20.04.2) ...
Selecting previously unselected package wireguard.
Preparing to unpack .../wireguard_1.0.20200513-1~20.04.2_all.deb ...
Unpacking wireguard (1.0.20200513-1~20.04.2) ...
Setting up wireguard-tools (1.0.20200513-1~20.04.2) ...
wg-quick.target is a disabled or a static unit, not starting it.
Setting up wireguard (1.0.20200513-1~20.04.2) ...
Processing triggers for man-db (2.9.1-1) ...
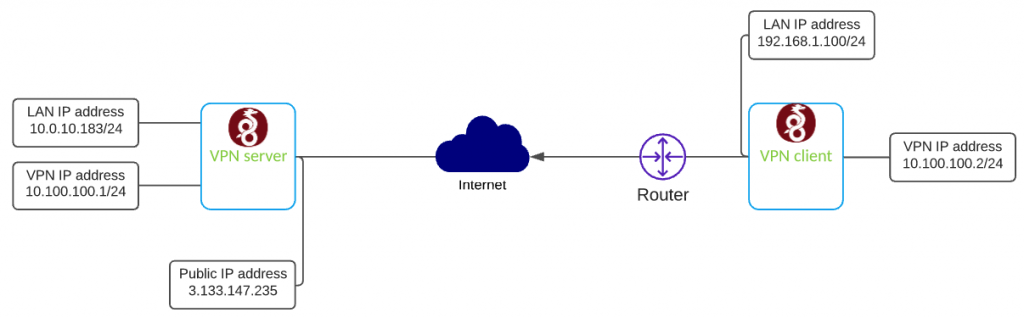
$:/home/artur# Configure the client to site VPN on Wireguard.
In this scenario, I will show you how to configure the client to site VPN on Wireguard. Below you can find the networking setup I will be using in this blog post.
Configure Wireguard VPN server
First, create private and public keys.
$:cd /etc/wireguard
$:umask 077
$:/etc/wireguard# wg genkey | tee privatekey | wg pubkey >publickey
$:/etc/wireguard# ls
privatekey  publickey
Configure VPN interface wg0.config on SERVER
[Interface]
Address = 10.100.100.1/24
SaveConfig = true
PrivateKey =
ListenPort = 51820

[Peer]
PublicKey =
AllowedIPs = 10.100.100.2/32- [Interface]
- Address – vpn address
- Privatekey – server private key
- ListenPort – port number VPN is listening on
- [Peer]
- PublicKey – client public key
- AllowedIPs – subnet allowed to send traffic from the server
Enable IPv4 forwarding
in a file /etc/sysctl.conf uncomment line
net.ipv4.ip_forward=1Now, quickly restart process to apply changes
sysctl -p
echo 1 > /proc/sys/net/ipv4/ip_forward
We are ready to bring VPN interface up and enable it on system start
chown -v root:root /etc/wireguard/wg0.conf
chmod -v 600 /etc/wireguard/wg0.conf
wg-quick up wg0
systemctl enable wg-quick@wg0.service
The server configuration is almost done. When you generate public key on client-server, paste it into the server config file in the [Peer] section.
Configure Wireguard VPN client
Before you start configuration, you have to install Wireguard on Linux Ubuntu and generate private and public keys. Follow installation steps for the server.
Next step is to configure VPN interface wg0.config on client.
[Interface]
Address = 10.100.100.2/32
PrivateKey =

[Peer]
PublicKey =
Endpoint = :51820
AllowedIPs = 10.100.100.1/32
PersistentKeepalive = 21- [Interface]
- Address – vpn address
- Privatekey – client private key
- [Peer]
- PublicKey – server public key
- Endpoint – public IP address of the server with port
- AllowedIPs – subnet allowed to send traffic from the server
- PersistentKeepalive – keep the connection between client and the server
We are ready to bring VPN interface up
sudo wg-quick up wg0-clientBelieve me or not, you should have a VPN connection is up and now you have encrypted traffic from your client-server. You can check the status by typing wg show – see my other blog post for more details