How to replace SSD disk in Dell XPS 13

Shares

I bought my Dell XPS 13 back in Jun 2014 with “only” 256GB SSD drive. After 18 months I know I will run out of free space so I decided to buy new SSD (SAMSUNG EVO 850 mSATA) and replace old one. Operation should not take more than 90 minutes, including copy data from small disk to new, bigger disk.

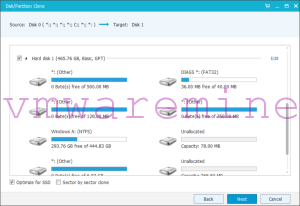
I used EaseUS ToDo backup software to make 1:1 copy data. Free version has really useful feature which let you extend partitions on target drive, so you do not have to deal with resize partition after clone

2016-02-03_08h08_05

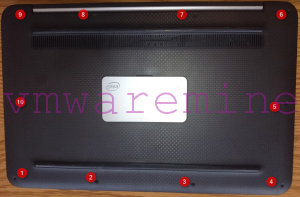
Once clone is done, you have to remove screws from bottom cover

2016-02-03_22h06_39

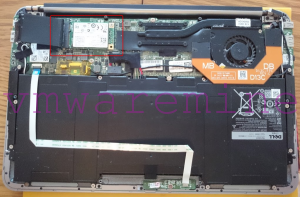
Gently remove cover and locate mSATA drive

2016-02-03_22h04_26

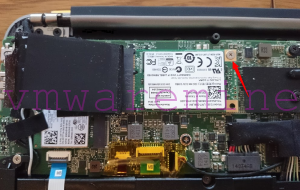
Remove one more screw, remove old disk and insert new disk

2016-02-03_22h06_20

That’s it. Put bottom cover back. Power laptop on and enjoy.


0 0 votes
Article Rating

Artur Krzywdzinski

Artur is Consulting Architect at Nutanix. He has been using, designing and deploying VMware based solutions since 2005 and Microsoft since 2012. He specialize in designing and implementing private and hybrid cloud solution based on VMware and Microsoft software stacks, datacenter migrations and transformation, disaster avoidance. Artur holds VMware Certified Design Expert certification (VCDX #077).

You may also like...

Subscribe
Notify of
guest
0 Comments
Inline Feedbacks
View all comments
0
Would love your thoughts, please comment.x
()
x

FOR FREE. Download Nutanix port diagrams

Join our mailing list to receive an email with instructions on how to download 19 port diagrams in MS Visio format.

NOTE: if you do not get an email within 1h, check your SPAM filters

You have Successfully Subscribed!

Pin It on Pinterest